How to include Sendcloud service points in your data flow
In this guide, you will find an explanation of how to incorporate Sendcloud service points in the data flow between your CMS (webshop), ERP/WMS systems, and Sendcloud. Please note that this guide includes most standard scenarios that you might encounter.
Requesting a label based on service point selection
For every service point in our database, Sendcloud has assigned a service point ID, which is referred to as to_service_point in our API.
To be able to create a label based on the service point the end customer chooses during checkout, the service point ID (to_service_point), shipping method (shipment_id), and to_post_number (only for DE DHL) have to be present in Sendcloud at the time of parcel creation.
How to determine which flow of data to use for the integration
Refer to the following decision tree:
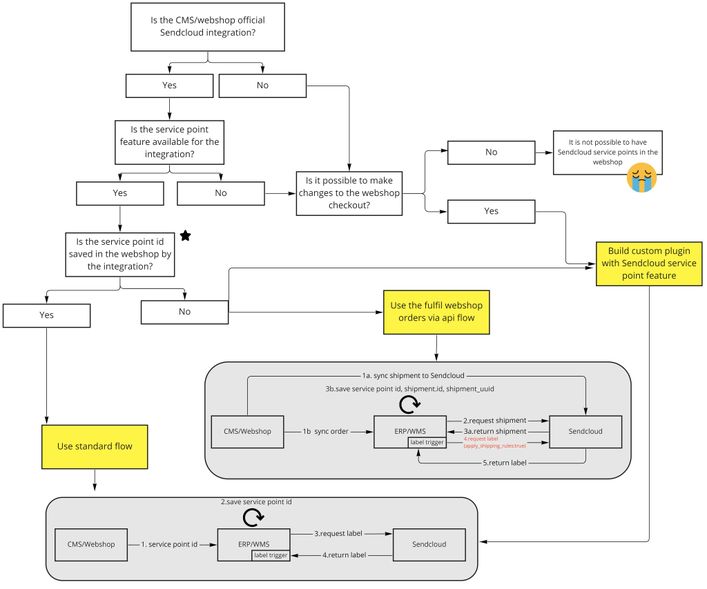
Most common integrations
| Integration | Service point id | To_post_number |
|---|---|---|
| Lightspeed New | order.shipmentData.location |
not saved |
| Lightspeed Old | not saved | not saved |
| Magento2 | sendcloud_service_point_id |
sendcloud_service_point_postnumber |
| Shopify | not saved | not saved |
| Shopware 6 | order.sendcloud_service_point |
not saved |
| Prestashop | not saved | not saved |
| Woocommerce | not saved | not saved |
Custom-built plugins using Sendcloud service points
In cases where we do not offer a plug-and-play integration with your CMS platform, or the integration does not save the service point ID to the webshop, there are two possible options:
- Embed the Sendcloud service points javascript code in your checkout
- Create your own service point picker plugin using our Service Points SPI.
For both options, based on the end customer’s selection, save the service_point_id, to_post_number, and carrier (as shown in the service point object) to the order in your webshop.
This information can then be sent to the ERP/WMS when the order is synced. It’s a good idea to save the carrier since this field can be used for setting more flexible shipping rules in Sendcloud, refer to the Standard flow section below.
Standard flow
As depicted in the diagram, the service_point_id (and potentially the to_post_number) are saved in the webshop and, most commonly, to the order. This information can then be sent to the ERP/WMS, where it is saved, and later can be sent to Sendcloud at the time of parcel creation. It’s important to note that the shipment.id has to be defined when creating a parcel to ship to a service point. This can be done via three methods:
- Using Sendcloud shipping rules. Use
shipment.id:8andapply_shipping_rules:truewhen creating a parcel withrequest_label:true, for example — if the checkout delivery method is PostNL service point, then Ship with “PostNL service point 0-23 kg”. The checkout delivery method name is defined in the webshop, and should also be sent to the ERP/WMS, and then to Sendcloud. - The Shipping Methods endpoint can be used. In the query, set the
service_point_id. - If the carrier is known in the ERP/WMS, the Shipping Products endpoint can be used. E.g.:
GEThttps://panel.sendcloud.sc/api/v2/shipping-products?from_country=NL&to_country=NL&carrier=postnl&weight=5&weight_unit=kilogram&last_mile=service_point
Fulfilling webshop orders via API flow
Learn the flow of achieving this in Fulfill orders from a webshop via API.
Note that when the integration fetches the shipment created by the webshop integration, the to_service_point, to_post_number and the shipping_method are also retrieved.